
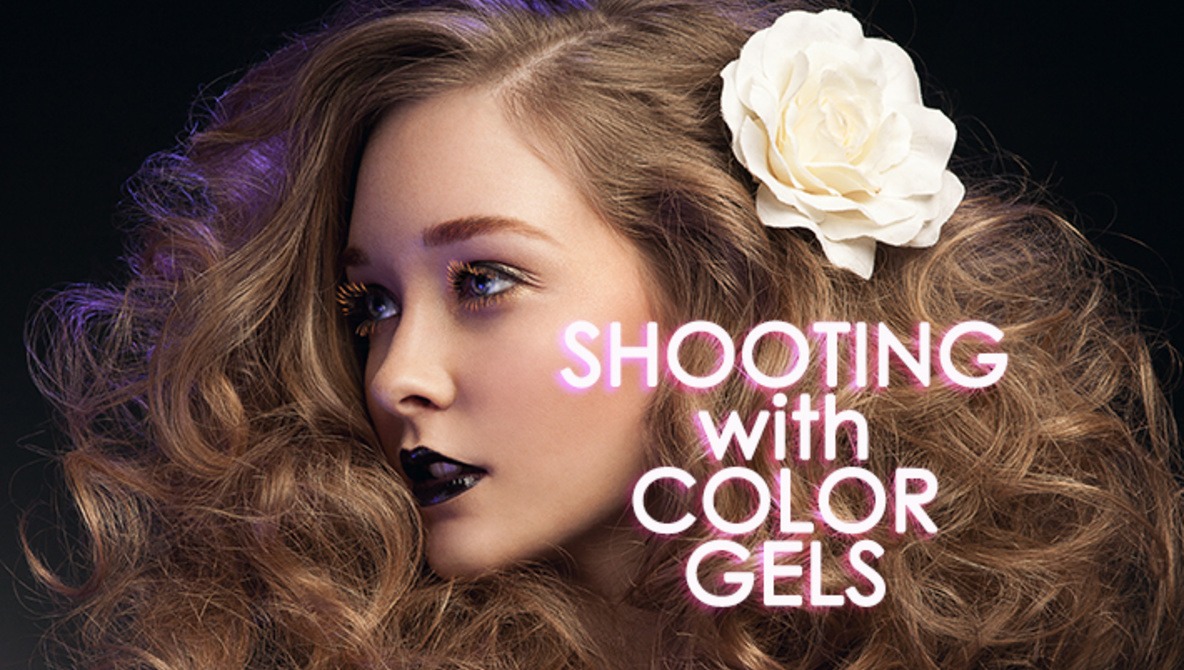
Shooting With Color Gels
There are times when I find myself shooting the same stuff or using the same lighting setup over and over again. Repetition helps to improve and fine-tune my skills, but sometimes it just feels boring and degrading, let alone useless for my portfolio.
But as much as I dislike feeling stuck and repeating myself, I now realize how such times in fact help me to become a better artist and shooter. It’s usually the desire to entertain myself and experiment that leads me to new personal artistic discoveries. It’s when I’m bored and want to “spice it up”, I start searching for new lighting ideas, tricks and techniques.
If you have come across this post at a similar time in your photography career, I hope a stream of new ideas and images will pump up your love for photography, inspiration and enthusiasm. Let me offer you a few fun lighting ideas in a series of posts, and I will start with one of my most favorite lighting accessories – color gels. I will also mention how to make each lighting technique execution rather affordable without compromising the quality of the outcome.
SHOOTING WITH COLOR GELS
Equipment that you will need
1. The strobes and flashes that you already have. Continuous lighting equipment will also work, but you have to be careful and make sure the higher temperature of the lamp doesn’t melt the gels, which in turn will damage the light bulb.
2. You can buy proper photography color gels or filters – they start from as low as $6.99 for a set of four 12-inch color gels online. But I personally use colored cellophane rolls or wrapping paper from hobby and craft stores.
I actually only had to purchase them once a long time ago, and I haven’t gone through 1/3 of any of my four rolls (yellow, green, red and purple). Each roll cost me under $5 and I use them in almost every studio photo shoot. So, not only they are really cheap, they also last for years.
The density of colored cellophane and color gels sheets may be different and colored cellophane is often very thin, so the resulting colors may be not as vivid. To solve this problem I simply double- or triple-fold it before mounting on the strobe, and, like I said, I am still not even half-way through my rolls.
3. Barn door / Gel frame assembly or a roll of duct tape. Obviously, if your studio is full of expensive lighting equipment and cool photography “toys”, and that’s how you and your clients like it, you might choose to go for proper color gels and gel frame assembly from your lighting equipment manufacturer.
I personally carry my colorful rolls and duct tape to all my commercial and personal shoots, and my clients and fellow creatives don’t care how I do the “color magic” as long as I get them the pretty pictures they are after.
If you end up deciding to use colored cellophane and duct tape, keep in mind, that the cellophane will melt if it’s placed too close to the modeling lamp as the lamp heats up during the shoot. The cellophane will be ruined and it may also damage the lamp if you’re not careful. I always turn off modeling lamps after the lights’ power and positions are adjusted for the shoot, so I don’t have to worry about it.
Shooting
And here comes the fun part! There are so many ways you can utilize your color gels, it’s not even funny. There are a couple of main ways of how I use color gels in my lighting setups: coloring rim lights and coloring the main light, and tons of variations of each. Let me show you what I have created with them and how I achieved those color effects.
COLORING RIM LIGHTS
Lighting diagrams for such setups are usually similar and vary slightly for different shoots. You can add one or two (or more) rim lights, background light, fill light, etc.
Variations:
1. Using only one strobe for colored rim light, subtle touch of color:

2. Using only one strobe for colored rim light, vivid and rich color. You need to pump up the strobe power and use a dense color gel, or fold your colored cellophane a few times to get nicer and richer color.

3. In the following image you can see that even though the lighting setup is similar to the previous (mirrored), there’s a lot more color on the model’s body. You can achieve this by moving the strobe with the colored light slightly closer to the camera plane allowing more light to spill on the model’s face and body, and, of course, position the model accordingly.

You can also control the width of the rim light by adjusting the position of the strobe, moving it along the camera-model-background axis (see illustration below). The closer the strobe to the plane of the model’s position, the wider the rim light will be. And the further back from the model’s plane along that same camera-model-background axis you place it, the thinner the rim light will be, i.e. less colored light visible to the camera will be spilling on the model’s face. I know this may sound confusing, but once you try this in your studio, you will see how simple it actually is.
Be careful to not move the strobe too close to the plane, in which the model is positioned, or the rim light will become side light, and side light can create messy shadows on the model’s face and ruin the shot. But it, of course, depends on what you’re trying to achieve in your photo.

4. Two strobes with color gels, one on each side, subtle touch of color. When I want a very thin rim light on the model’s cheek, I usually point the colored light approximately at the back of the model’s head.
5. Two strobes with color gels, one on each side, vivid and rich colors. I also added a red color gel onto the background light. I was shooting with gray backdrop and it looked really dull behind the colorful subject.

6. You can also play with longer shutter speeds, but I will talk about this technique in one of my future posts.

COLORING THE MAIN LIGHT
This is when it helps to have a roll of colored cellophane. I can cut a generous piece and wrap it around my beauty dish or even a soft box, if I want to.
Variations:
Basically, everything goes – you can mix strobes and flashes, and try various light modifiers. I normally combine complimentary colors, but it never hurts to experiment with unexpected pairs of colors.
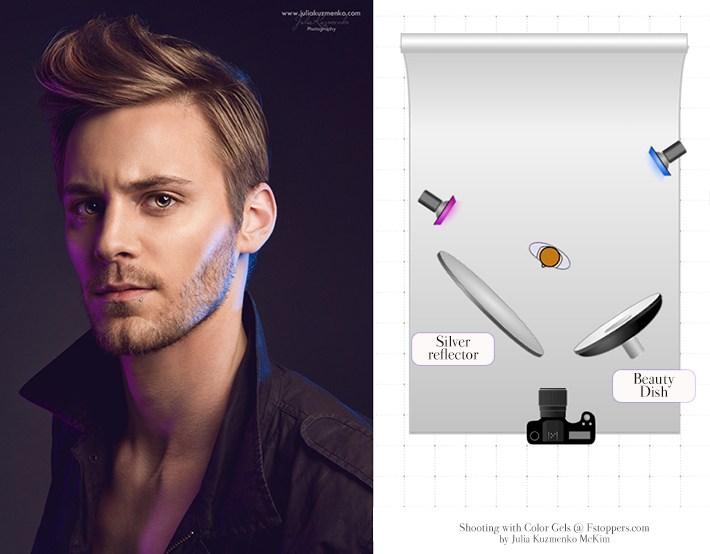
1. In this setup I used a beauty dish on a strobe (red) and a simple flash (green).

2. Two strobes: hard blue light and soft red light. There’s a simple metal reflector on the strobe (blue) and it’s placed a little further away from the model, so that it creates hard light and a well-defined shadow on the wall.
The strobe with the beauty dish (red) is much closer to the model, the light is softer (larger size of the light source, plus diffuser and it is closer to the subject) and its mission is to only fill the shadow behind the model with rich red color.

These are the setups I’ve played around with, and I’m sure you will come up with many more if you like the idea of experimenting with color gels. Come back and show us what you got!
Source: https://fstoppers.com/studio/shooting-color-gels-2723