Shooting With Mixed Studio Lighting

When we talk about on-location mixed lighting we usually mean shooting with light sources of different nature, such as natural ambient light and artificial, or shooting with lights of different color temperatures (tungsten, fluorescent, flash, etc.).
There are dozens of cool effects that one can achieve when mixing ambient light with controlled lighting, but today I would like to talk about mixing lights in studio – impulse (i.e. strobe or flash) and continuous. I love this technique and hope my article inspires you to try it out too.
Let’s talk about the important things that we need to keep in mind to successfully mix strobe and continuous light and then move on to the fun things that we can do with this technique.
Why Mixing Studio Lights Is So Cool
- You can create awesome light & color effects in camera and they will look like you’ve spent a week in Photoshop.
- You don’t have to buy additional lighting equipment if you’d like to use continuous light – the modeling lamps of your strobes will do the trick.
- These effects greatly depend on your exposure settings, the speed and direction of how you move your camera during exposure, the reflective surfaces you add into the frame, and the colors you mix into the equation. These options alone open the door to a never-ending exploration process, and one could probably stick with this one lighting technique for the rest of his or her life and never run out of new ideas and effects.

Important Things To Keep In Mind
• For the purpose of this article let’s agree that our ISO is set to 100 for all examples.
• Continuous and strobe light are normally of a different color temperature, and while in some scenarios this may work to your advantage, in others you may want to match your light sources’ output color by using color filters or gels. I will talk more about this in a separate article.
• When we shoot with strobe light in studio our shutter-speed usually is a little below maximum synch speed, typically somewhere between 1/125 and 1/250 (and up to 1/800 – 1/1600 for some medium format cameras) depending on the equipment. We increase our shutter speed to those numbers to avoid any influence of the ambient light, such as light from the windows in the studio or modeling light of the strobes. It’s important because ambient light, when it interferes with your intended controlled lighting, can reduce the sharpness of details in your image and alter its color temperature, thus add some undesired colors into the photos.

Shooting With Strobe Light
Given there’s no ambient light in the studio and we’re shooting at the same aperture and constant strobe output power, we can shoot at slower shutter speeds, and the picture will not change because it is exposed during the tiny bit of time that your strobe fires, which is way faster than the maximum synch speed of DSLR cameras (check out our post on flash duration comparison between Broncolor, Profoto and Einstein).
So, when we shoot with strobes we normally control exposure by adjusting our aperture and the strobe output power.
Shooting With Continuous Light
When shooting with continuous artificial light, on the other hand, the final picture that is formed on the camera sensor will mainly depend on the exposure value (EV ) – the combination of shutter speed and aperture. So, when we shoot with continuous light we normally control exposure by adjusting our aperture and shutter speed, as well as the light source power.
I know this may be boring and a little confusing, but bear with me, I’m getting to my point.

Let’s see Oleg’s demonstration on how exposure values actually affect images taken with strobe and continuous light in this example. We’ll set our aperture to f/11 and start with shutter speed 1/200 and then make it a stop longer in each of the following shots. The output power of the both strobes is the same, although the flash is turned off in the strobe on the left side, so the right side of the image is lit by strobe light, and the left side is lit by continuous light only. Don’t mind the difference in color temperatures for this exercise.

We matched our strobe and continuous light exposure at f/11 and 1/25. Note that in order to get sharp picture on the left side (lit by continuous light) at 1/25 as in the examples above, the camera should be mounted on a tripod. But for the actual lighting effect we’re after we should shoot with a hand-held camera.
Now if we intentionally shake our camera during the exposure, the side lit by strobe light will still look the same (remember, it is exposed during the time that your strobe fires and not affected by your shutter speed), but the side lit by continuous light will get blurry (see illustration below).
With these settings you can already achieve interesting effects, but if you’d like to go even further and create blur, which looks more like “light haze”, you should slower your shutter speed 3 f-stops down, and lower the power of your continuous light source 3 stops down as well. Keep the aperture setting the same.
I want to once again stress on how important it is to have no ambient light present in the studio when practicing this lighting technique.
 

Oleg’s full article on shooting with mixed lighting in Russian: www.photoindustria.ru.
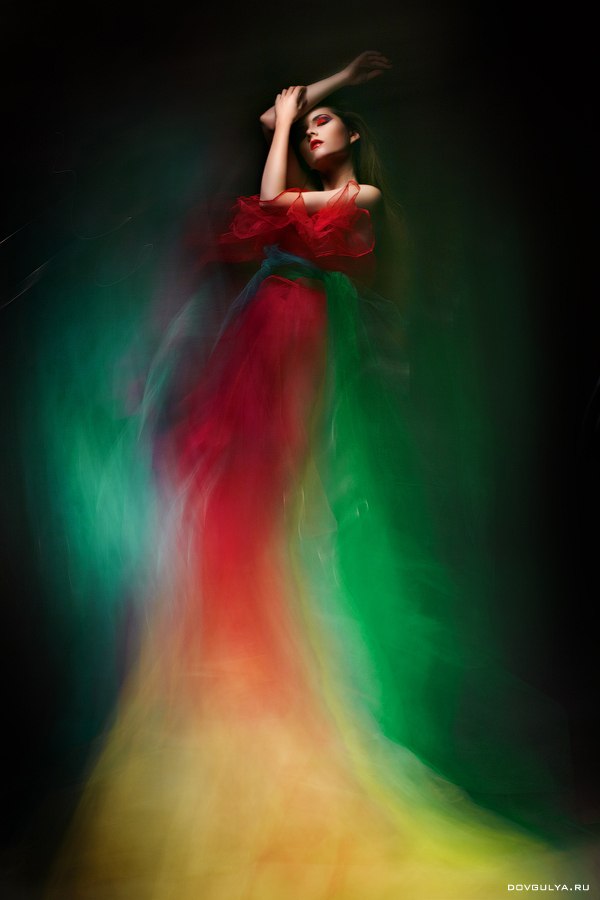
Now that we’ve figured out the exposure settings side of the technique, let’s look at an example, which my dear friend, Fashion, Beauty & Commercial photographer Aleksey Dovgulya, kindly shared with us.
Once an advertising agency asked Aleksey to create a modern interpretation of the Rolls-Royce’s Spirit of Ecstasy statue. The team selected a model who would fit their envisioned idea, purchased 7 meters of satin fabric and invited a fashion designer to create something impressive out of the piece of fabric.
Aleksey chose to set up hard frontal light to create prominent highlights and shadows and imitate the metal shine of the statue. He used a beauty dish with grids in front of the model as the main light and the only strobe light in the setup. A couple of monolights with regular metal reflectors on both sides of the model with flash turned off and only modeling lamps turned on.
It is very important to place and point your light sources so that that main strobe light “freezes” the details that you want sharp and pronounced in the picture. And the modeling light should only spill on the areas that you want blurred. As I mentioned before, photographers often match the color temperature of the continuous and strobe light by using color filters, but in Aleksey’s scenario the warmer colors created by the modeling lamps actually perfectly fit the idea and the mood of the image.

Aleksey suggests that when practicing this technique you should first set your camera settings at, for example, 1/160 at f/8, ISO 100. And after the lights’ power and direction are adjusted, change the shutter speed to 0,5 – 1 second (1″ at f/8, ISO 100) and shake and move your camera during the exposure.
“To create an impression of flames at the bottom of the model’s dress I zoomed out and moved my camera up during the exposure,” says Aleksey. He also recommends trying out different shutter speeds and various camera movements: “The photos will look different every time, and you will figure out what effects you like the most as you shoot,” he says.
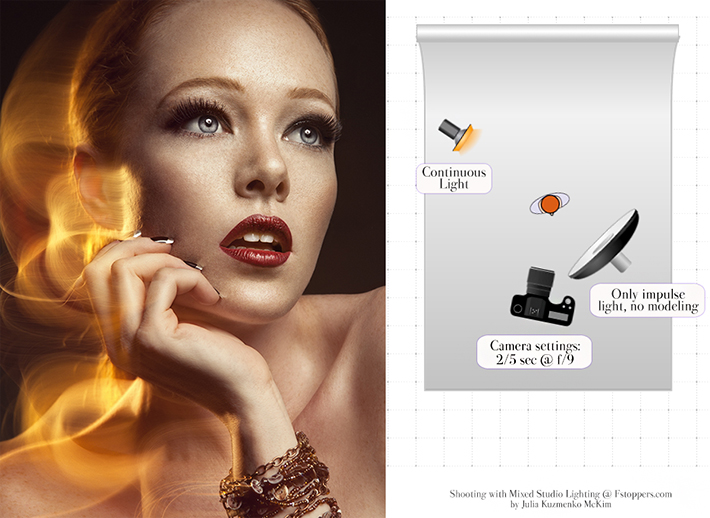
And one more example from me:


Key Takeaways:
1. Make sure there’s no ambient light in the studio. Only your continuous light sources should be on when practicing this technique.
2. Place the continuous light source so that it doesn’t spill any light onto the model’s face or other areas of the image you’d like the strobe light to “freeze” and preserve sharp details.
3. Turn off the modeling light on your strobe. Some lighting equipment allows the modeling lamp to automatically go off right after the flash is fired, check if your strobes can do that.
4. Set your camera and the lights to “regular” settings first (for example 1/160 at f/11) , then start prolonging the shutter speed and adjusting continuous light as needed.
5. Use reflective objects, accessories and shimmering fabrics to add interesting highlights and “light trails” in your photos. Avoid using dark clothing and fabrics as they will absorb the light and weaken the effect.
6. If you use color gels on your continuous lights watch them closely to make sure they don’t melt – continuous light sources tend to heat up quite quickly.
7. Use black or dark gray backdrop or if you’re using a brighter backdrop make sure no light spills on it as you shoot.
8. Try longer shutter speeds from 1/2 up to 5 seconds and various camera movements.
9. Add a fog machine.
Good luck!
Source: https://fstoppers.com/studio/shooting-mixed-studio-lighting-2689
